React Fiber your first scene

React Fiber is an amazing way to integrate three.js into your project in a much easier way, at least in my opinion.

React Fiber is essentially a React renderer for three.js. Meaning if you are very comfortable and familiar with using React it allows you to set up your app in a very similar way to a regular React app.

According to their docs everything that works with three.js works in React Fiber and there are no exceptions. Not only that it keeps updating with three.js to make sure all your code is up to date.

If you are interested I advise you to look over all the docs but for this blog I will help you understand setting up your first scene.

What is a scene?

A scene is essential in React Fiber. A scene is where all of the elements of your React Fiber are able to be displayed. Its the environment where everything lives.

How to setup a Scene

In React Fiber this can be done simply by the import { Canvas } as seen in the example below.

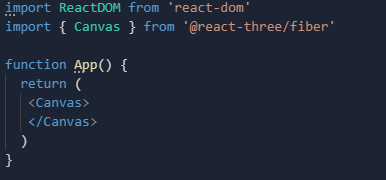
In three.js in order for it to run you need 3 things: a scene, a camera, and a renderer. With the Canvas import it does all of these for us in the background. It sets up a Scene and a Camera, the basic building blocks necessary for rendering and It renders our scene every frame, you do not need a traditional render-loop. Sidenote, this gives you a default camera, if you want different cameras read the documentation here on React Drei.

The next important element that must be added is lighting, this is what allows us to see around the scene and as well if you are wanting to turn 2D objects into 3D objects then you will need certain lighting for that. For now though, we are just going to focus on adding basic lighting for 2D shapes.

You can do that by adding an ambientLight and DirectionalLight like below.

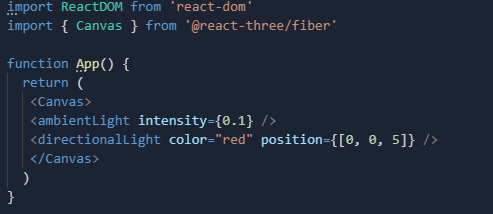
Ambient light is just the environmental light that sheds on everything, whereas the directional light is light coming from a specific direction that can help highlight features of your objects.

Now you have a basic scene created you can now add some geometry and see them come to life and play around with the camera settings to be able to create 3D objects or shine light in a different direction. Follow the blog for the next installment where we go over geometry and adding basic shapes into your scene such as cubes, spheres, cones, etc…

Extra Resources

React Fiber Documentation

React Fiber Examples

three.js Documentation

Tools of Titans

As human beings we are incredible, we are incredible in and of ourselves, but with tools we truly can become so much more.

I have always been someone who is naturally able to achieve what I need to and perform at a level sufficient to get the jobs done. More than that though I have always been someone who knew how to use tools and extending myself much further beyond what I could do just by myself.

Theres no shame in using the tools that are in front of us, as they say; work smarter, not harder. So, with that being said I am going to be giving some of my favorite VS Code and Chrome extensions that can really help you excel in web development. Now this is by no means all of them, I use many, many extensions. These are just some notable ones that I am using right now, lets get into it.

VS Code

CSS Peek

First up is for those who work heavily with their CSS. This is a pretty self explanatory app but essentially it allows you to hover over an element in your code and see the CSS applied to it without leaving your current page or you can click into it to have it take yo directly to your CSS. Give it a try CSS Peek.

Color Highlight

This next one is even more simple than CSS Peek, Color Highlight allows you to be able to visualize what colors you are adding onto your CSS. Whether you are using Hex, RGB, or just writing the color name it will change in real time for you to see. This also makes it very easy when scrolling through to find your code.

Ponicode

Ponicode is incredible. It is a test suite that allows you to test your functions right in VS Code. Lets say you have an email validator function and you want to test it and also how it would respond to multiple edge cases, you can do that with Ponicode right inside VS Code. As a coder something like this is invaluable, because a lot of our work is based in debugging and this allows us to hopefully avoid those bugs.

Ponicode can also generate some test suites for you based off your function.

Chrome Extensions

ColorZilla

If you have ever looked at a site and really loved a specific color, and you want to apply it to your site. Then ColorZilla is for you. It allows you to extract colors from any part of a site and get the Hex code or RGB for it in order to use it in your CSS. It’s as simple as downloading the extension and then when you find a color on a site that you want, click on the extension and select the pick color from page. It has other features but this is what I found myself using most often.

CSS Peeper

CSS Peeper takes this a bit further and actually allows you to see not only one color of your choosing, but all the colors present on the page, and as well the CSS that has been applied. This app is pretty incredible and will let you know of the colors, fonts, and even the on-page assets. The most incredible part is that it actually allows you to hover over elements and find out all the CSS associated with it.

The future of the X-Men box selected

Web Developer

Now Web Developer takes this all to an extra level. It essentially gives you all the information on a site that you would want or need and allows for you to manipulate that as well, in order to see what would happen with the site. This is like the Swiss Army knife of extensions. There is too much to go over in this blog with this extension but check it out for yourself and play with it here. This one is for sure worth your time.

Session Buddy

These last few are going to be just simple productivity apps. They are extremely nice to have and can make life a little easier. First up is Session Buddy. As a programmer you know the dilemma we face with always having a million tabs open. Not only can that slow down your computer, but it can also slow you down. Whether it’s forgetting which tabs are which, or not being able to read the tabs anymore because they are so condensed. Session Buddy allows you to save a tab session and recall it later. That way all the tabs you need open are saved in their own group but as well now your tab bar is less cluttered and chrome wont need to worry about keeping those tabs running.

Awesome Screenshot

This one has been a tried and true extension for me. It simply just allows you to take quick screenshots and screen records and it allows you to do so without saving them to your computer. Especially if you just need a quick screenshot but wont need to save it, this allows that for you.

Checker Plus

Last but not least is Checker Plus. Checker Plus is maybe the most simple but I find it extremely useful. With working remotely and heavily with teams and team members you’ll need to constantly stay on top of your calendar. Checker Plus allows you to have a quick view of your calendar no matter which tab you are on. It will also give you a countdown til your next scheduled calendar event.

Agenda View for Checker Plus
Countdown until next meeting

Why I chose to not be a programmer?

Now this might seem very backwards and opposite of what this blog is all about at first sight. In realty, it’s exactly what this blog is about. Now Let’s get this straight, I am a programmer but I am also much more than that.

I chose to go down this path because I wanted to make a difference in the world, I wanted to be able to have the tools necessary to solve any problem that could arise. I didn’t want to be a programmer, I wanted to become a problem solver.

We live in a world that is basically run by technology and practically anything considered tech you run across is going to run off of some type of code. I’ve always had great ideas for apps, websites, and tools that people could use, but I never had the means to implement them. I needed to learn the tools necessary to make my dreams, my ideas, and my innovations come to life. So this was the path for me, to get where I needed to be to change the world, or at least the sphere of influence that I can control.

I started my journey and coding was not easy and so I wanted to give up and thought maybe it was not for me. And then I ran into a video by a youtuber by the name of Joma Tech. He did a collaboration with IBM for their Call for Coders competition that encourages coders to help the environment and save the world with their code.

It spoke to me and I knew that I wanted to be a programmer, not because I wanted to sit in front of a screen all day and type. But Because I wanted to make a difference.

I had been working in sales for 5 years and I was done sitting at a deck calling people and trying to convince them to buy something that they might not even want. Our time is finite and I was not about to continue wasting most of the hours of my day doing something that was not fulfilling and I knew, would not truly help anyone.

I was done being this:

It was time to be this:

I love what I do and I wouldn’t take back any of the sacrifices I have made to be where I am at now. Of course work is always gonna be work. At some point you will have bad days, bad jobs, and in coding, many many moments of wanting to pull your hair out. But one thing I have learned is that if you love it and know what you want, then it is all worth it.

Sometimes I feel like a masochist because I legitimately enjoy the struggles, and the pain that comes with solving problems. I love not knowing something because that means I have more to learn. The growing pains are real but I would go through them day in and day out because I love it and I know I can make real changes with it. It’s not about the money, the perks or the status, it’s about the journey and where I can go with it. The amazing thing with becoming a programmer is that I can build the path in which I walk.

If you are reading this because you have been looking into programming and want to go down this path, then go for it! Whether you want to self-study, go to a bootcamp, or attend a university, in the words of Shia LaBeouf just do it!

Shia LaBeouf's message: +1000 speech +500 potential illusion. Convices the  victim of this item to just do what the user wants the person to do. Can be  combined with the gun used

If it is the right occupation for you and you are willing to put in the work, you can do it. And luckily for you the programming field is a huge community where there is always handfuls of people willing to help and help you solve any problems you might have.

Helpful resources to get started

Switch Up – Top Coding Boot Camps

Career Karma – Best Coding Boot Camps

HubSpot – Beginners Guide

useContext

React is amazing, specifically React components are incredible. They add modularity, they help you organize your code much easier, and they give you an isolated environment to work on your code. At the same time components are not perfect at first glance. The biggest issue many people can have with components is accessing data in other components.

React Component Tree - React JS APP - SmartCodeHelper

Components have a tree-like hierarchy as shown in the picture above. Components are like a family with parents, children, and siblings. In the tree the parent is always the component directly above and the children are below, so in this picture the App is the parent of Header and Tasks and each Task are children of Tasks and siblings to one another.

In React if information is needed in one of the components it needs to be passed down from parent to child as a prop, or properties. Siblings cannot pass information to one another and children cannot pass info up to the parent unless a callback function is used inside the parent component first and then sent to the child.

As you might have already figured out this can cause some real frustration if let’s say one sibling has information that another sibling needs. The only way you could do that is make sure all of that info is inside of the parent component and then pass it down to the siblings. It will inevitably make code more confusing and harder to keep track of whats going on with your code. Today I am not go into any more detail than that, so if you want to learn more about props and components visit Reacts main site here.

Today I will be talking about a way around that using a hook know as useContext. Prepare to make your life a whole lot easier!

useContext gives you a way around this component tree and allows you to pass information/properties to any component. I like to think of useContext as a waiter and a customer waiting to eat.

useContext allows us to create a provider (the waiter), a consumer (the customer), and the food (the information/properties). The information/props will be created in a new file (the kitchen).

So now that you can have some mental imagery in your head, let’s go through the steps on using useContext.

First, let’s create our new folder (kitchen) in VS Code where we can get our order ready for the consumer to take in. Inside of that folder you also need to create a file, name it whatever you want.

Inside of this file is where the magic happens.

As you can see in the code above you need to import createContext from react. Then we need to set our createContext to a variable, in this code we are passing a cart state variable to multiple components, so we named ours CartContext.

Next, a function is provided with the prop of children to pass down the information/props we want to the consumers.

Inside of this function is where you can add whatever it is you want passed to your components. Since we wanted to pass a cart state variable and the setter function for that, we declare that variable in the function.

In the return statement is where the provider (waiter) can grab the values that need to be given to the consumer (customer). Use Yourcontext.Provider as a component and pass down the values you want and then {children} inside of that provider component. Export YourContext and YourProvider, and now everything is done in the kitchen(context file), lets see how your waiter (provider) gets this to your costumers (consumers).

Now we leave this folder and go into our index.js file and wrap our entire App in our Provider so every component can access our context.

Aside from wrapping your App in your provider make sure to import this provider from is relative path as show above.

Now we can use this state variable in any component that I want, whether they are parents, children, siblings, cousins, aunts, friends, acquaintances, etc.. At this point it doesn’t matter, now the properties you set in your folder can be accessed anywhere. Now in order for that to be accessed you must import the context in whatever component you need it in, like so:

And then the final aspect you need is to bring your context into the component by using useContext and destructure out the values you would like to use, like so:

It can be confusing at first but give it a shot and play around with it and it will click and when it does, welcome to a much cleaner way to pass around props throughout your App.

Example of the freedom useContext allows

Extra Resources

Yondus Favorite Function

Yondu and his Yaka Arrow

If you are an avid Marvel fan or at least have seen 1 of the first 2 Gaurdians of the Galaxy movies then you know Yondu. The blue-skinned, red-mohawked, bounty hunter and his whistle controlled flying arrow. So it seemed fitting that today we could talk about what I would assume Yondus favorite function would be, the arrow function.

Arrow functions were introduced in JavaScript ES6 and can be confusing for new programmers especially those who may have started with the traditional function like so:

Cssi 2 Javascript Functions - Learn.co

With that being said, once you can understand the idea of an arrow function, it can make life easier in many ways and result in a much cleaner and simplified code. So, that’s what I hope to help with today.

We will start with a simple traditional function and break that down piece by piece to understand how to restructure a normal function to an arrow function. Hopefully gaining a better understanding of the overall structure of arrow functions.

Here we have a simple add function and its invocation. Lets break it down to look something like our example below (slide to reveal).

The first part of this transformation from a traditional function to an arrow function is rather simple. The function declaration becomes a variable in which our arrow function will be stored. Our function name can stay the same, the only difference is now it is stored as a variable that will be equal to our function! And as you can see, the parameters stay the same.

One side note to keep in mind is that your parameters in a traditional function always need to be encased in parentheses whereas with an arrow function they only need parentheses with 2 or more parameters. Otherwise, no parentheses are necessary (see example below).

Now the final transition from a traditional function to an arrow function is the most interesting to me and the part that can help clean up code, and lessen keystrokes.

You might be freaking out, “where are the curly brackets!?”, “Where’s the return!?” A function cannot exist without those, right? Well not necessarily. This is the part where Yondu would be really proud of his little arrow. The arrow in this syntax implicitly returns what follows after, so no curly brackets or return required. 🤯 Now if you feel like you can’t be without those, they can still be added as well.

This is a simple overview of arrow functions, they can get much much more complex. But this should give you a good idea of how they are structured and how you can start turning your traditional functions to arrow functions in JavaScript. With some practice and lots of debugging you’ll be able to start using array methods with it and get more and more complex with your arrow functions.

ES5 Traditional Function vs ES6 Arrow Function

Extra Resources

Arrow Function Expressions – W3 Schools

Arrow Functions – MDN